

Elements Produkttour -
Jeden Dienstag um 14:00 stellen wir Ihnen Elements live vor!

Frequently asked questions
Sie können sich alle Fragen und die dazugehörigen Antworten gerne auf unserer deutschen Seite ansehen.
TIPP
With Elements you can search for items, research your offers and orders, enquieries, prices, order and much more. 1
We have summarised the most frequently asked questions here:
Understanding the basics
Search the catalogue and create queries
Research enquieries, quotations & orders
View and edit your data
Reuse content and data
Familiarise yourself with Elements
To work efficiently with Elements, we recommend that you familiarise yourself with the basic operation.
What can I do in the Elements header?
In addition to the item search, you also have the option of carrying out one or more further searches in your partner’s catalogue by calling up a new, so-called workspace.
Why not try out this unique option right now and search for different items in two different workspaces.
TIP
If you have created favourites in the catalogue or if your partner already offers you favourites, you can call them up comfortably and at any time in the header area of Elements. Do you still have questions? Then take a look here: „Set up your own catalogues/favourites„.
Should your partner allow direct communication in Elements, you can send or read a message from the Elements header at any time. You are sure to find the answers to your questions under „Communicate with your contacts„.
In the top right-hand corner, you will find access to your „My Account“ area as well as further information on Elements.
What are the workspaces in Elements?
On the left you will always see the different workspaces in which you can browse different contents in your catalogue in parallel. A workspace is opened when you
- search for items while your dashboard is displayed,
- open a new workspace from the header,
- open a favourite from the header or dashboard,
- call up items linked to an item.
You can view your workspaces at any time and close them either via the overview or the X symbol next to the workspace.
How and where can I search in Elements?
In Elements, you can of course primarily search for suitable items in your partner’s catalogue. You will find details on this in the section „Search for items in your catalogue„.
However, you can also search in other areas at any time, especially in your dashboard or „My Account“ area. To do this, simply use the so-called quick search, which is available to you for most information. You can recognise it by the input field below the column heading of the individual tables.
As soon as you click into a quick search, you can either enter the search term directly. As soon as you leave the field, the search term is converted into a filter and displayed above the table.
For columns containing a date, amount or fixed terms, you can also use a filter. You can either enter a time or number range or choose from the options available.
You can remove a set filter by clicking on the X in the tag.
If you would like to edit an existing filter, simply click on the filter icon on the right above the list. A list of all filters will open. You can now edit all filters.
Alternatively, you can click on the tag you want to change. The list of all filters opens and the filter you clicked on is selected.
Search for items in your catalogue
You can access your catalogue at any time and search for items intuitively. Just get started or click here to find out more about the search.
How do I find the right item?
You can search for an item at any time – no matter which area of Elements you are in.
You can enter your search terms in the search area, which you will find at the top of Elements and recognise by the text „Article search …“.

As soon as you have entered the search terms and confirmed them with the enter key, you will see the hits. If you still see too many hits, you can simply narrow down your search by entering further search terms.
Can I limit the search to items that meet certain criteria?
You can always determine which items you see in your search results. To do this, you can filter by any information you like.
To do this, either enter a search term, for example if you are only looking for items that are from one manufacturer. Or search only for items that are currently available.
How can I influence the sorting?
You can sort the items displayed according to your preferences. To do this, simply click on the framed box at the top right above the displayed items. Then select the field you would like to sort by.
When searching for the correct field in the selection, you can use the keyboard to enter the name or part of the name of the field you are looking for. The selection is then restricted to your input.
To do this, simply click on the sort field and then double-click on the selection. This will now be highlighted and you can type over it.
TIP
If you have selected the field, you can also determine how it is sorted. If you have selected a field, an icon will appear to the right of the selection. You can recognise the current sorting by the selection:
- An arrow pointing upwards indicates that the sorting is ascending. Items with lower values in the selected field are displayed above items with higher values.
- A down arrow indicates that the sorting is in descending order. The items with the higher values are displayed above those with the lower values.
You can change the sorting by clicking on the icon.
You can also use sorting to sort by fields that are not in the selected view. This allows you to quickly sort by fields that you cannot see in the selected view.
TIP
If you are in the table view, you can also see from the column header whether sorting is taking place according to one of the columns. If sorting is active, the column is underlined in blue.
If you move the mouse over the corresponding column heading, you can also see how the current sorting is set. If the icon is highlighted in blue, sorting is based on this field. However, if it is not highlighted in blue, you can activate sorting by this field by clicking on the icon.
There is a special feature with the sorting in the column header: In contrast to the click in the selection in the upper area, you can not only change the sorting. A third click removes the sorting by field and reverts to the standard sorting by relevance.
Sorting by relevance is dynamic. The items are displayed with decreasing relevance based on your search query.
NOTE
You can of course also sort hierarchically according to various filters. To do this, please click on the selection for sorting and scroll all the way down to the „Custom sort“ entry and click on it.
In the dialogue that now appears, select the first field you want to sort by and select the type of sorting. Then click on „+Add“ and select the next sort field.
Click on „Apply“ to activate the sorting and you will see the „User-defined sorting“ entry in the sort selection.
To adjust the sorting, go back to the entry in the sort selection and edit the sort settings according to your requirements.
How are the conditions determined?
When you search for items, you will see in the column „Your price“ the price valid for you when ordering the smallest sales quantity. This is calculated on the basis of the base price minus the agreed discount.
What information is available to me about an item?
When you have found an item and click on it, you can see the information about the item on the right. Depending on your partner’s setting, this can be the following information:
- item images
- designations, descriptions and features
- availabilities & stocks
- price information
- accessories, spare parts, alternatives
- aets in which the item is included
Collect items in your shopping cart
The principle in Elements is very simple and you probably know it from other shops. You place items in the desired quantity in your shopping cart, edit it and send it off.
How can I add an item to the shopping cart?
You can add an item to the shopping cart in the desired quantity by entering the quantity in the „In the shopping cart“ column and then clicking the button with the shopping cart.
Furthermore, you can also enter the quantity in the item information and also place the item in the shopping cart by clicking on the shopping cart button.
You can also search for items in the shopping basket itself.
How do I quickly add many items to the shopping cart?
In order to be able to quickly place many items in the shopping cart, we recommend the view in the form of a table. Switch it on and make sure that you see the column „Add to shopping cart“.
Search and filter the item list so that you see all the items you want to add to the shopping cart. Now enter the quantity and click on the shopping cart button. Repeat this for all the items you want.
If you would like to order variations of an item, we recommend that you enter the quantities in the variations assistant.
TIP
How can I select several variations?
If you want to add several variations of an item, please select the variantion „Basic item“ (or „Grundartikel“). You will now see a table with all available variations. Enter the desired quantities there. Whenever you come to a new field, you can see at the top which variation it is, how much it costs and, if applicable, whether it is available.
You can jump from field to field with the tab key and thus quickly enter the quantities for the individual variations.
TIP
You can also select a variation directly and place it in the shopping basket. If a variation is not the „basic item“, Elements adds it directly to the shopping basket.
How can I add another item in the shopping cart?
If you have already placed items in a shopping cart and you want to add more items, you can either do this via the global search or search for the desired item directly in the shopping cart.
Simply enter your search terms in the „Add“ field below the items and you will see matching items in a selection list. You can adjust the selection list with each additional entry. In the selection list you will see the most relevant items at the top. To select an item, you can either click on it or select it with the arrow keys on your keyboard and confirm your selection with the enter key. Immediately after the item has been added to the shopping cart, you can adjust the quantity.
If you cannot identify the desired item from the selection list, please click on the magnifying glass symbol in the search field. A search window opens with the information you are familiar with and you can narrow down your search further here. Once you have found the desired item, select it – by double-clicking or clicking on the „Apply“ button.
How can I add accessories or alternative items to the shopping cart?
When you have selected an item, you can see in the item information whether other items are related. If you want to add an item from it to the shopping cart, you can „unfold“ it and then add it to the shopping cart in the desired quantity.
Which items can I add to a shopping cart?
If you place an item in the shopping cart, Elements checks whether this is possible. In some exceptional cases, you will see a message if Elements cannot add the item to the shopping cart. The following items cannot be added to the shopping basket:
- items that are not available for sale
- items that have variations – here a variation must be taken over into the shopping cart
How can I delete items from the shopping cart?
To remove an item from the shopping cart, you must right-click on the desired item and then select the entry „Delete order line“.
Alternatively, you can click on the entry with the same name in the options menu above the selected tab.
You can also enter 0 as quantity. All items with a quantity of 0 will then be removed when the shopping cart is finalised as a price enquiry or order.
TIP
Can I process several shopping carts at the same time?
You can prepare different price enquiries or orders at the same time at any time by creating several shopping carts. To do this, simply click on the + symbol below an already existing shopping cart.
You can now switch between the shopping carts and edit them individually. As soon as you want to add an item via the shopping cart button, you must decide which shopping cart the item should be added to.
How can I delete a shopping cart?
If you do not want to create either a price enquiry or an order from your shopping cart, you can delete it at any time. To do this, either click on the „Delete shopping cart“ entry in the menu in the shopping cart or right-click on the shopping cart and select the corresponding option.
If you delete the shopping cart, no further processing takes place.
Complete your shopping cart
As soon as you have collected all the items in the shopping cart, you can order these items or start a price enquiry. In addition, you can view and edit the details of the shopping cart at any time by clicking on the info symbol above the items.
Can I specify a different delivery address?
Click on the info icon above the items. The details of the shopping cart are displayed on the right. You can see which address is stored. If you would like to deliver the order to a different address, activate the „Different delivery address“ field.
Further address fields will then be displayed. You can now either enter the address or select a delivery address you have already used or specified in the „Delivery address“ field.
Of course, you can also select a delivery address and change it afterwards.
Can I specify a delivery date?
You can also specify a delivery date in the shopping cart details, which you can access via the info icon at the top of the shopping cart. If you do not enter a delivery date, the value „as soon as“ will be used.
To specify the delivery date, please click in the „Delivery date“ field and enter your desired date. You can also either enter only the day, e.g. 20, in which case the 20th of the current month will be entered. If you would like to enter 20 February, for example, you can simply enter „20,2“ or „20.2“.
Of course, you can also select the day in the calendar by clicking on the calendar symbol. In the calendar you can also see the days of the week.
Can I specify reference numbers?
So that you can better assign your price enquiry or order to your internal transaction, you have the option of specifying your internal reference numbers. For this purpose, the fields „Our sign“ and „Our proof“ are available in the shopping cart details, which you can call up via the info symbol at the top of the shopping cart.
Your reference number will be included in all documents generated from the price enquiry or order. You can also search for this reference number in your dashboard.
Enter your reference number in the „Name“ field. Then you can clearly assign the enquiies in the overview of your open enquiries in the dashboard.
TIP
Can I leave further information about my order or price enquiry?
You can enter information about a different delivery address, a delivery date or internal reference numbers in the details of a shopping cart. If you also want to send important information, you can use the „message“ field. Here you can enter information or questions that are important. The contact sees this information while processing the price enquiry or order.
How can I enquire prices or place an order?
As soon as you have placed all the desired items in your shopping cart and made all the necessary entries, you can submit the shopping cart in the form of a price enquiry or an order.
If you submit a price enquiry, you can either see the status of the price enquiry in the dashboard or immediately in your dashboard in the „Open offers“ tab.
If you have submitted an order, you can see the status of the order in your dashboard in the „Open enquiries“ tab or directly in the „Open orders“ tab.
Track the status of your enquiries
As soon as you have sent in a price enquiry or an order, you can track the status of your price enquiry or order at any time.
Why is my order or price enquiry „in process“?
If you have created an order or price enquiry, you can look in the „Open enquiries“ tab in your dashboard. If you can see it there, your contact person has yet to process the enquiry. You can see the status in the form of the processing progress.
The status of the order or price enquiry is „in process“ as long as it is currently being processed by your contact person and has not yet been transferred into an order or into an offer (price enquiry).
You can view the order or price enquiry at any time by clicking on the icon to the far right of the price enquiry or order.
Why was my order or price enquiry „cancelled“?
As long as your order or price enquiry is still in your dashboard in the „Open enquiries“ tab, your contacts have the option of cancelling your order or price enquiry. In this case, it will be displayed to you as „cancelled“. Contact your contact person if you still have questions about this.
Can I edit my order or price enquiry afterwards?
Once you have submitted an order or price enquiry, you can no longer edit it. Please contact your contact person if you still want to make changes.
During the conversation, you can also process the order or price enquiry together with your contact person. While he is processing it, you can call it up by clicking on the icon in the „Open enquiries“ tab. You will then see the current status of the order or price enquiry and can update it again and again.
You can also use the message function. Then you can also exchange information „live“.
TIP
Why can’t I find my order or price enquiry in the open enquiries?
As soon as your contact person has processed and accepted your order or price enquiry, it is no longer an open enquiry. The same can happen if your shopping cart is directly transferred into an offer or order.
You will then find an order in the „Open orders“ tab as long as it has not yet been completed – i.e. delivered and invoiced.
You will find a price enquiry or an offer in the „Open offers“ tab as long as it has not yet been transferred into an order or accepted by you.
You can easily filter the orders or offers by your reference number, which you entered when creating the order or price enquiry.
TIP
How can I accept an offer?
In your dashboard, in the „Open offers“ tab, you will find all offers that you have not yet accepted.
As long as an offer is open, you can view it again by clicking on the PDF symbol. An overview of all the receipts associated with this offer will then open on the right. You can see the desired document after clicking on it.
As long as the offer is valid, you can accept it by clicking on the button of the same name. If the offer is still valid, you will see a short summary which you must please confirm. The accepted offer is forwarded to your contact person. He or she can then transfer it to an order.
If the offer is no longer valid, you will see this information. In this case, please contact your contact person.
If you have any questions, please use the message function and send the relevant offer as a link to your contact person via the chat.
TIP
Research your data
You have an up-to-date overview of your orders and all necessary processing steps at all times. For example, you know whether your order has already been packed and invoiced or whether your payment has already been received.
Which data can I see?
Your dashboard is your „head office“ where you can research various data stored in your partner’s ERP system. You can view current data that is still being processed as well as data that is already in the past.
Current data in the ERP system are offers and orders that have not yet been fully processed. One exception is the open posts, which give you an up-to-date insight into your partner’s accounting.
„Historical“ data are orders and all related information, such as the delivery notes and invoices included and the items ordered.
Familiarise yourself with the filter and search options within the lists in the Dashboard (see Familiarise yourself with Elements). This will simplify your research and help you find the information you need more quickly.
TIP
Why is an order „open“?
You can view your orders in your dashboard. The tabs „Open orders“ and „Orders“ are available to you.
An order is open as long as it still has to be packed or invoiced in whole or in part. In order that you do not have to search for these orders in the multitude of your orders, you will find exactly these orders separated in the tab „Open orders“.
If the order is completely packed and invoiced or has been marked as such in the ERP system, it is „completed“ and you will only see it in the „Orders“ tab. In the „Orders“ tab you will find all your orders – regardless of the processing status.
Has my order been packed yet?
You can see the packing status of your orders at any time. An order or an ordered item is marked as „packed“ if a delivery document has been created and the ordered item is included in it. This status is indicated by the symbol with the two arrows. If you move the mouse over the symbol, you can see the status. In addition, you can already recognise the status by the colour of the symbol.
- „not packed“ (grey) = the ordered items still have to be packed
- „partially packed“ (orange) = part of the ordered items have already been packed, further items still need to be packed
- „completely packed“ (green) = all ordered items have already been packed
- „closed, not (completely) packed“ (blue) = part of the ordered items will not be packed or delivered anymore
Has my order already been invoiced?
Are you already waiting for your invoice? You can see whether an order or an ordered item has already been transferred to an invoice. The symbol with the leaf and the tick is available for this purpose. If you move the mouse over the symbol, you can see the status. In addition, you can already tell the status by the colour of the symbol.
- „unreckoned“ (grey) = the ordered items still have to be transferred to an invoice.
- „partially calculated“ (orange) = a part of the ordered items has already been calculated, further parts still have to be calculated
- „completely calculated“ (green) = all ordered items have already been transferred to an invoice
- „completed, not (completely) calculated“ (blue) = a part of the ordered items will no longer be calculated
Can I track the delivery?
You may be able to access the tracking for your order directly from your order. If you see an icon with a lorry, you can call up the shipment tracking for most orders. If you do not see a lorry symbol, there is no shipment data.
If you move the mouse over the „sent“ symbol, you will see the status of the sending displayed.
- „Not sent“ (grey) = the ordered items still have to be sent.
- „partially shipped“ (orange) = part of the ordered items have already been shipped, further items still have to be shipped
- „completely shipped“ (green) = all ordered items have already been shipped
Click on the symbol to open a window. There you can see the individual shipments for the order on the left-hand side. If you click on a shipment, you will see its chronological history at the top. At the bottom of the “ Shipment details“ tab, you will see either the summary of the shipment or the items contained in it. You can then see the chronology of the shipment in the “ Extended Shipment Details“ tab. Clicking on the „Request tracking information from shipping service“ button opens the service provider’s shipment tracking in a new browser tab.
Have I already paid for the order?
You can see if you have paid an order by hovering the mouse over the coin symbol. An order is „paid“ when the accounting department has correctly assigned the incoming payment to the order.
It may be that you have already initiated the payment but it has not yet been booked by the accounting department.
TIP
The payment can have the following states:
- „unpaid“ (grey) = you still have to pay for the order
- „underpaid“ (orange) = you have paid part of the order
- „paid“ (green) = you have paid the order in full
- „overpaid / repaid“ (red) = you have paid too much and have a credit balance
How do I find a receipt?
If you are looking for a receipt or specific receipts from a certain period or date, you can find it directly from your dashboard in the „Documents“ tab.
Simply enter the voucher number or date in the search field below the corresponding field or use the filter options. By clicking on the PDF symbol, you can call up the current status of the receipt and then download or print it.
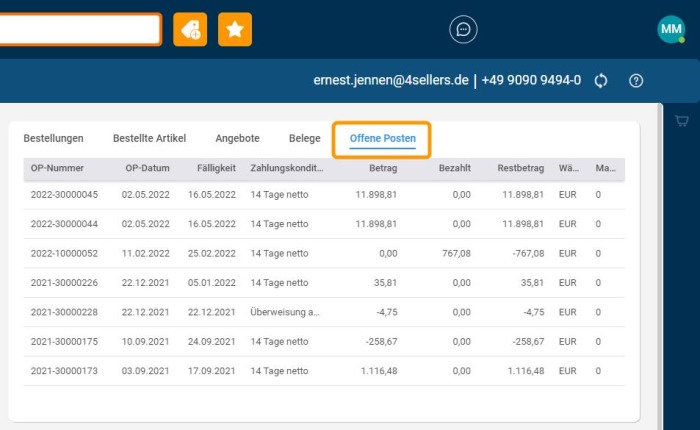
Do I have to pay anything else?
In your dashboard you can always see the current status of the open posts you have with your partner. This way you can see if you still have to pay something or if you might have a credit balance.
Order items again
Via your dashboard, you always have access to all your orders, offers and the items you have already ordered. You can add these to a shopping basket again as a whole or just individual items.
How can I place an old order again?
On the right-hand side of your dashboard, you will find all the offers and orders you have placed in the past.
If you would now like to place an old order again, please select it with the mouse. Click on the right mouse button to open the context menu. You can now click on the entry „Add to shopping cart“.
If you have not yet created a shopping cart, you can now create a new one. The items from the selected order will now be transferred to the new shopping cart.
Can I order individual items again?
Of course, you can also reorder items that you have already ordered in the past. To do this, simply go to the „Ordered items“ tab and search for the desired item, e.g. using the filters.
Now right-click on the desired item and then click on the „Add to shopping cart“ option. Then select whether you want to create a new shopping cart with the item or add the item to an existing shopping cart.
What information is transferred to the shopping cart?
If you add offers, orders or only individual items that have already been ordered in the past to a shopping cart, these are checked to see whether they are still available for sale. If this is not the case, the item will not be added to the shopping cart.
If an item from an old order is transferred to the shopping cart, the quantity ordered at that time is transferred with the corresponding sales unit. In addition to the item descriptions, the prices and discounts are also updated based on the currently valid conditions.
Communicate with your contacts
In Elements you have the possibility to exchange messages with your contacts in real time – just like you are used to from your smartphone.
How can I send a message to my contact person?
To send a message, please click on the message icon at the top left of your profile information. Now you can see which contacts you can send messages to. Select the desired contact person or channel and write a new message below.
Please note that you can send messages either directly with your contacts or in a channel. A channel consists of a group of contacts. As soon as you write a message in a channel, all contact persons are informed about the receipt of the message and can reply to you.
You can recognise the read status of your message by the ticks. Messages marked with one tick have not yet been read, whereas messages marked with two ticks have already been read by a contact person.
How can I recognise a new message?
As soon as you have received a new message, you will see a small counter on the message icon. Click on the symbol to open the message area and read the new message and also react to it.
Can I refer directly to orders?
In most cases, your communication with your contacts is occasion-related. You will most likely refer to specific items or orders or offers. You can support your contacts by referring to the occasion in your message so that they do not have to do research first.
If, for example, you would like to refer specifically to an order, please find it directly in your dashboard in the tab „Open orders“ or „Orders“. Then right-click on the order and select the option „Copy link“. Now you can send this link directly to your contacts next to the new message by clicking on the left symbol below the input line.
If you still have questions about one of your enquiries, please call it up by clicking on the link in the dashboard and then select the entry „Copy link“ in the shopping cart menu. Now you can send a message again and refer to the enquiry or the shopping cart.
Can I relate my communication directly to items?
Of course, you can also support your contact persons by also sending the appropriate links by message if you have questions about certain items.
In doing so, you can send both the link to an individual item by either right-clicking or selecting „Copy link“ from the item’s menu in the quick view.
Alternatively, you can also send a list of items or your search results by selecting the „Copy link“ entry in the menu at the top right of the workspace.
Your contacts also have the option of sending you links to items. If a message contains a link to items, you can call it up directly. You will now see a list of items or a single item. Basically, you „simply“ take over the search result of your contact persons and can proceed as usual and transfer the desired items into a shopping cart.
Can I also send documents or pictures?
In addition to messages, you can also send pictures in a message. To do so, please click on the picture icon and select the desired picture.
Documents are currently not supported. Please continue to send them by e-mail to your contact person.
Can I prioritise a message?
If you want to send a message to your contact person that you think is very important, you can mark it as „prioritised“. To do this, enter your message, click on the symbol with the exclamation mark and send the message. Now the message is clearly highlighted.
Edit your customer data
You can see which masterdata is stored in your partner’s ERP system. You can request changes or enter new master data.
What are my masterdata?
You can see what information is stored in your customer account in your partner’s ERP system. You can view all masterdata on your dashboard in the tabs of the same name. This information includes:
Masterdata
The masterdata is your main address and the communication data under which your partner can reach you. In addition, you will also find tax information that your partner uses in the context of orders.
Bank accounts
You can see which of your bank accounts your partner has.
Delivery addresses
Here you will find all the addresses that your partner has stored in their masterdata. You can access these when you create a shopping cart.
When you select a different delivery address in a shopping cart, your delivery addresses from the masterdata are displayed. However, it is also possible that even more delivery addresses are displayed. This happens if you have entered different delivery addresses in previous orders. Then you can also access these addresses.
TIP
Contact person
If your partner works with several of your colleagues, you will see them as contact persons and can view their stored contact details.
Documents
You can only see documents if your partner has given you access. Then you can see which documents they have stored in their ERP system and can display them or download them.
How can I change my data?
If you want to change existing masterdata, you can simply move the mouse over the desired information. You will see a small pencil in the upper corner of the information if you can modify it. As soon as you click on the pencil, a dialogue appears and the current information is given. You can now change it.
As soon as you have sent the change, your contact person receives a request to check the changes and transfer them to the ERP system. As soon as he has done so, you will see the changed information.
Changes are not visible immediately, but only after they have been confirmed.
NOTE
How can I add new data?
If you want to add new masterdata, you can move the mouse in the desired tab on your dashboard next to an already existing piece of information. A new „card“ with a plus symbol will appear. As soon as you click on this card, a dialogue appears in which you can enter the new information.
Once you have sent the new information, your contact person receives a request to check it and transfer it to the ERP system. You will see the new information as soon as he has adopted your changes.
New masterdata is not visible immediately, but only after it has been confirmed.
NOTE
Create your own templates
You can conveniently compile items that you order again and again in as many templates as you like. You can then transfer the templates to a shopping cart and apply them to the current situation. You can combine templates or modify existing templates to suit your requirements.
How can I create a template?
If you would like to order the same items again and again, place them in a new shopping cart. Please do not forget to also enter the quantities that you would like to order repeatedly. Once you have added all the items to the shopping cart, select the shopping cart tab at the top, click on the menu at the top right and select „Save as new template“.
Name your template so that you know by its name which items are included or for what purpose you are using this template. Later, you can select your templates by name and add their items to the shopping cart.
TIP
How can I add a template to the shopping cart?
If you have created templates and would like to use them in your order, you can access these templates very conveniently.
If you only want to add one template to your shopping cart, you can do this directly from your dashboard. To do this, simply click on the symbol to the right of the template in the „Saved shopping cart templates“ area. Elements creates a new shopping cart and adds the items it contains to the shopping cart in the saved quantities.
Alternatively, you can access your templates in an existing shopping cart. To do this, select „Add saved template“ from the shopping cart menu and select the template.
Can I mix several templates?
You are welcome to add several templates to a shopping cart. To do this, select „Add saved template“ from the menu in an existing shopping cart and select the first template. Repeat this step for each additional template you would like to add.
Now you can edit the shopping cart as usual and prepare it for the current order or price enquiry.
How up-to-date is the item data in a template?
If you add a template to a shopping cart, Elements checks the items it contains.
Only items that you can still order will be added to the shopping cart. Items that can no longer be ordered will not be transferred.
NOTE
Elements always takes over items from a template in the quantity in which they are contained in the template. Of course, Elements determines the prices and discounts up to date. This means that the conditions are always up to date.
How can I edit a template?
If you want to edit a template, simply transfer it to a shopping cart. Either by transferring the desired template from your dashboard to a new shopping cart or by adding the template to a shopping cart.
Now edit the items in the shopping cart according to your wishes. Add items, remove items, change quantities. Now you can click on „Update template“ in the shopping cart menu and select the template you want to change. As soon as you have done this, the items currently in the shopping cart are saved in the template with the corresponding quantities.
How do I know which items are in a template?
If you no longer know which items are included in a template, you can easily check. Simply select the desired template in the dashboard in the „Saved shopping cart templates“ area and click on the icon on the right. A shopping cart opens with all the items in the template.
Alternatively, you can click on „Add saved template“ in the menu of an existing shopping cart and select the desired template. The items from the template are added to the shopping cart.
Only items that you can still order will be added to the shopping cart. Items that can no longer be ordered will not be transferred.
NOTE
If the number of items transferred to the shopping cart no longer matches the display in the dashboard, delete the template in the dashboard, edit the shopping cart according to your wishes and save it as a new template with the same name.
TIP
Design individual item lists
Would you like to see item information that is important to you? Then you can create your own views in Elements.
What is a view?
When you search for items, you see them in a list. The information displayed is predefined. If you are missing information or do not need information, you can define yourself which information you want to see. The following information is stored in a view:
- Name of the columns
- Width of the columns
- Order of the columns
To ensure that you always see the same information when searching for an item, you can create one or more views of your own (see separate question). To do this, define which information you would like to see during the item search. To do this, you can „Use as default view“ by selecting the option of the same name in the menu next to the „View“ selection.
Of course, you can also create different views and switch between them.
When you change a view, your search and therefore the items displayed remain unchanged. Only the information displayed changes – i.e. the columns you set in the view.
NOTE
How can I change a view?
Depending on how it is better for you, you can view items in the so-called tile view or in a table. You will always see the view that you last set.
If you want to change the view, please select between tile and table view in the top right-hand corner.
How can I edit or create a view?
You can create your own view quickly and easily. To do this, click on the menu next to the selection and click on „Edit view“.
On the right-hand side you will now see all the columns that are already included in the view. The following options are available to you:
1. Remove a column
Move the mouse to the column you want to remove. An icon with a wastebasket appears on the right-hand side. Click on it to remove the column.
2. Add a column
Click on the +-symbol at the top right. You will now see all the columns available to you. The columns already in the view are activated. You can therefore also remove a column this way by unchecking it.
Gehen Sie nun zur gewünschten Spalte und aktivieren Sie die Checkbox vor der Bezeichnung. Die Spalte wird am Ende der Ansicht hinzugefügt.
Wenn Sie nicht Scrollen möchten, geben Sie oben einfach einen Teil der Spaltenbezeichnung ein. Die Auswahl wird dann darauf eingeschränkt und Sie können die gewünschte(n) Spalte(n) aktivieren.
3. Reihenfolge verändern
Möchten Sie die Reihenfolge verändern, fahren Sie mit der Maus auf die linke Seite der zu verschiebenden Spalte. Nun können Sie die Spalte mit der linken Maustaste „halten“ und an die gewünschte Stelle verschieben.
Once you have adjusted the view to your preferences, you can apply the changes.
- If you want to apply the changes in the current view, click on the „Save“ button.
- If you would like to apply the changes in a new view, please click on the arrow next to the „Save“ button and select „Save as new view“. You must then enter the name of the new view.
If you have made changes to the standard view delivered by Elements, you can only transfer these changes to a new view of your own. In this case, you can only use the „Save as new view“ button.
NOTE
To do this, you can „Use as default view“ by selecting the entry of the same name in the menu next to the „View“ selection.
How can I rename or delete a view?
If you have made a mistake in naming a view or if you want to change the name of the view, please select the view and click on the entry „Rename view“ in the menu next to the selection. Now you can enter the desired new name.
If you no longer wish to use a view, please select the view and then click on the „Delete“ entry in the menu next to it. Please note that you cannot restore this view.
Set up your own catalogues/favourites
To search for items, you can use the global search in the header. All items are searched. However, you can also create your own catalogues that you can search specifically. These are the so-called favourites.
What is a favourite?
You can use a favourite to repeat a search over and over again under the same conditions. When you call up a favourite and search in it, the search is always carried out taking into account the restrictions you have set in the favourite. In addition, the favourite is always called up with the view that you have also stored for this favourite.
A favourite always saves the following contents:
- Selected view (including sorting)
- Selected filters
- Search terms in the item search
How can I create my own favourite?
To create your own favourite, please open a new workspace by clicking on the button to the right of the search.
Now you can – if desired – select your own view. If you have activated the filters, you will only see items that match your criteria. Finally, you can create a new favourite by selecting the entry „Save as favourite“ in the menu at the top. As soon as you have entered the name for the favourite, your favourite is saved.
Where can I find my favourites?
You can call up your favourites in two different places.
On the one hand, you can click on the star symbol to the right of the search. There you will see your favourites sorted alphabetically as well as the ones you may have entered.
Alternatively, you can access your favourites with one click in the „Favourites“ section of your dashboard.
A favourite always opens in a new workspace. You can switch between these workspaces by clicking on them in the left navigation.
How can I edit my favourites?
You can rename or delete the favourites you have created. To do this, simply right-click on the desired favourite (at the top right next to the search or in your dashboard) and select one of the two entries.
You cannot change a favourite that has already been created – only rename it. To change it, you must create a new favourite with the same name.
If you want to modify an existing favourite, first call up the favourite you want. Now delete it in one of the two places mentioned above. Now make the desired changes (view, filter, …) and save the favourite. You can simply use the name here that you used for the favourite you just deleted.
Why can’t I edit all the favourites?
You may also see favourites that you have not created yourself. These favourites have been created for you to simplify your search for items. You can neither rename nor delete these favourites.
- Here you will find all the questions we know with the answers. We try to illustrate these with the help of videos. Please understand that the design in the videos may differ from the current design of Elements. If possible, we will ensure that the functions described are included in the latest version of Elements. ↩︎


„*“ zeigt erforderliche Felder an


Partner Werden
Wir freuen uns auf den Kontakt und helfen Ihnen bei aufkommenden Fragen gerne weiter!
„*“ zeigt erforderliche Felder an
Wir freuen uns auf die Anmeldung und helfen Ihnen bei aufkommenden Fragen gerne weiter!
„*“ zeigt erforderliche Felder an